Pages

Showing posts with label Frugal crafting. Show all posts

Saturday, June 11, 2011

Quick and Easy Kid's Bathrobe


LMS has two hooded towels for bathtime: a purple one I made her and a cow one that my mom made her. However, she's realized that mommy has a bathrobe, and awhile ago she decided she needed one too. Being the cheap frugal person that I am, I wasn't going to buy one for her, especially once I realized I could easily make one myself.

On our next infrequent visit to wallyworld we picked out an inexpensive bath towel ($5 or 6, I think) and some coordinating ribbon and bias tape (a dollar or two each).

Then the stuff sat in my craft cabinet for several months.

This week I finally had the time and inclination to make LMS her long-awaited bathrobe.

It was a pretty quick and easy process, but I didn't take pictures, unfortunately. Luckily it's pretty easy to follow the process.

First I folded the towel in half, laid it on the floor, and had LMS lay on top of the towel with her arms outstretched. The fold was at her shoulders.

I decided how wide I wanted the sleeves and body of the bathrobe and carefully cut out the piece below the sleeve on one side. I then had her stand up and I folded the towel in the other direction so I could make sure the cuts were the same on both sides.

I then cut down the middle of the front and cut a small circle on the fold for the neck hole. Next I sewed double bias tape to the cut edges so they'd be nice and neat.

Then I sewed the side seams- first a straight stitch, then a zigzag on the edges. Then I sewed the seam flat so it wouldn't stick up.

I sewed a loop on the back of the neck for easy hanging, then I sewed a ribbon to the bathrobe at the side seams.

LMS loves her new bathrobe!

Monday, March 29, 2010

Frugal Crafting: Homemade Travelmate

About a year and a half ago I made my own travelmate. I'd seen them online, but didn't want to pay the $80+ price tag, which didn't include shipping. I also didn't think their method of securing the carrier to the car seat (two screws that screw into the back of the car seat) looked really secure.
Why would I need one in the first place? Ever try carting a heavy car seat through the airport, along with whatever suitcases you have and the child that needs said car seat? It quickly becomes too much to handle. By adding wheels to the car seat, you can easily pull it through the airport. You can even strap your child into the seat before heading off to the far reaches of the airport.

It wasn't that hard to make- two pieces of wood screwed together, with corner supports on the inside for added suport. I cut holes in the wood for the straps that would hold it to the carseat. Then I added an axle and wheels.

The finished product wasn't very pretty, so I covered it all with some denim fabric (sewn and hot glued), then added the straps.

The car seat rests on the small ledge, and is held to the travelmate by two sets of straps- one goes through the LATCH straps that hook into the car seat when not in use, and the other follows the path of a regular seatbelt (under the armrests and around to the back). Once strapped in, the car seat isn't going anywhere.

I've used it on a couple occasions, and have only come up with one thing I'd change. I used some webbing as a handle for dragging the whole contraption, but it really needs a rigid handle for added stability. I think some metal tubing from the hardware store should work, but I haven't had a chance to try it out yet. 

Even with the non-rigid handle it worked quite well and cost a fraction of the original. The wood was scraps my dad had laying around, as was the metal rod I used for the axle. I did pay a dollar or two for the 'hub caps' (I don't remember what they're really called), and the wheels were about $12 on ebay. I also paid about $5 for the straps and buckles, and I had the fabric in my stash. All together, I paid less than $20 for something that costs more than $80 (not including shipping), and if I only use it a few times, I don't feel guilty about wasting lots of money :)

Monday, March 22, 2010

Frugal Crafting: Fabric Wallet for Cash Envelopes

I saw this post, which inspired me to make my own fabric wallet. I decided if I was going to make a wallet, I should make it how I wanted it. So I put more slots for cards- I wanted room for IDs, library cards, club cards, debit card, and so on. Instead of a pocket for cash, I used the pocket to hold the card stock attached to the cash envelopes I made.

the card pocket section

upholstery microfiber(?) fabric I used for the outside

the outside, laying flat. the seams weren't as straight as I'd like (too many layers), so I'm hand sewing some ribbon to the outside to cover them

cardstock sliding into its pocket behind the card pockets

all put together- patterned purple fabric for the card pockets, dark purple corduroy for the backing

folded in half

my lovely hand holding the flap down

the ribbon for the trim and the buttons and hair ties to hold the flap down

Costs:
Purple pattern fabric- been sitting in my stash for awhile
Purple corduroy fabric- also been sitting in my stash for awhile
Tan upholsery fabric- bought 1/2  yard at JoAnns for 60% off- paid $2.80, but used only about 1/4 of it, so about $.70
Purple ribbon- $1.99 for the roll, but I won't use it all- probably 1/4 of it, so about $.50
Buttons-$1.58
Purple Thread- borrowed from my mom
Total: $2.78

Monday, March 15, 2010

Frugal Crafting: Cash Envelopes

I found some paper envelopes here, but since I made a fabric wallet to put them, rather than buying one, I made my own templates to fit the wallet I made. I followed her lead in putting them together- I definitely like the idea of the piece of cardstock that slips into the wallet to hold the envelopes in place.

template on top, unfolded envelopes beneath

folded envelopes

I used a glue runner to stick the envelopes shut

the finished envelopes

I punched holes in the bottom of the envelopes and in a piece of cardstock that will hold the envelopes into the wallet

I used some ribbon to lace the envelopes to the cardstock

Costs:
Paper: a friend had some left over from another project and gave it to me
Ribbon: given to me with a bunch of other sewing stuff by my BIL- he'd been storing it since his mother died 15 years ago, and he finally sorted through it all last year
Crop-o-dile: Christmas present from my SIL!
Glue runner: already had from multiple other projects
Total: $0

Monday, March 8, 2010

Frugal Crafting: Mesh Veggie Bags

I saw some mesh veggie bags here, and wondered why I hadn't thought of that. I'm very good about taking my cloth grocery bags to the store (except when I was collecting bags for my fused plastic project), but I hadn't thought about taking reusable bags for my produce.

I filed the idea away, under my 'to do after we move and get settled' list, and didn't think about it again till I found some mesh laundry bags in the dollar section at Target. They're big- about 3 feet by 2 feet- and I realized I could easily make some mesh produce bags out of them.

I cut each bag into 4 rectangles. Since there was already seams in 3 sides, I only had to sew one side and the top or bottom of each smaller bag. I used the original drawstrings in the two bags that included it, and made my own drawstrings and drawstring channel for the other two.
You can see which drawstrings were recycled and which I made.

They were quick, easy, and cheap, and now I can do even more to reduce the amount of plastic we use. Cool!
Total cost:
2 laundry bags from Target: $1 each, $2 total
8 mesh produce bags: $.25 each, since I already had the thread and crochet thread (that I used for the drawstrings)

Have you tried using mesh bags for produce? How'd it work out?

Monday, February 22, 2010

Frugal Crafting: Fused Plastic Bag Snack Bag & Envelope

Awhile ago, I found several blogs where people used fused plastic bags to create things. At the time, I didn't have any plastic bags since I take cloth bags when I shop (except for Target, because their bags are just the right size for the trash can in my craft area), so I had to make an effort to start collecting them.

Last week I decided I had enough bags, and set about making some fused plastic bag fabric. It ended up being a bit trickier than I expected- the process is a bit fiddley, and there was some trial and error involved in trying to get some satisfactory results. I have to agree with Dana, who said that Target bags work the best. They're a teensy bit thicker, and seemed to stand up to the process a bit better. I did do some with bags from wally world, but the results were not as satisfactory.

I tried adding some embellishments to a couple of the sheets:
I cut out the little starbursts from a bunch of wally world bags and put them under the top sheet of plastic- I like how this looks.
I cut out the letters for LMS's name from various bags and put them under the top layer of plastic (hard to see with the letters blurred, sorry).
I used both of these pieces to make a snack bag (original idea here) for LMS- the starbursts on the back, her name on the front.
I sewed the bottom and sides together, and then used the iron to fuse the open edges a bit. I was making it up as I went along, so if I make another one, I'll sew the top edge first, then sew the sides and bottom. I used adhesive velcro dots to close the snack bag. If I make another one, I would put the velcro dots on before sewing the seams, and sew them to make sure they stay in place.

I had planned on making cash envelopes out of folded fused plastic bags, but I think the fused plastic is a bit thick for that (and I had a hard time getting even, consistent fusing), so I changed my mind. Instead, I made a zippered envelope to hold our gas money for the month.

I also made a sheet of fused plastic bags with the top layer being a sheet of plastic from a Target bag, with the ink on the inside so it wouldn't bleed (as recommended here).
I sewed the word 'gas' on a small piece of plain fused plastic, then sewed that to the sheet I wanted to use for the envelope. I tend to be a perfectionist, and want things to be perfectly even and neat, but I tried to squash that and just let it turn out how it wanted. Not sure if I like the results, but it's a learning process.
I still have some sheets of fused plastic left, but I haven't decided what exactly I want to do with them- more snack bags, more zippered envelopes, something else entirely? I'm not completely satisfied with how the fused sheets turned out- I had a hard time getting them evenly fused, so I think I'll keep saving Target bags and do some more experimentation. I did like the shopping bags Dana made, but my fused sheets didn't look nearly as nice as her did. Maybe with some more practice...

Total cost for this project: zero.
I collected the bags as I shopped, and I had the zipper, thread, and velcro dot already.

Monday, February 15, 2010

Frugal Crafting: Twine Letters


The S that is featured on this blog is a wood letter that I bought at JoAnn's and covered with twine.

I saw a similar project here, and figured it wouldn't be too difficult to replicate. In theory it wasn't, but in actuality it was. An "S" is a lot harder to wrap than a "T", let me tell you. I eventually figured out a way to do it so it still looked nice.

It wasn't till I was looking at the picture on my computer that I noticed something off. Anyone else see it? I truly didn't realize it till then, either. Not while I was working on it, not while I was taking the picture...
Anyway, the other side looks like this:
Not nearly as nice and even, and it looked a lot worse in person.

So I put it away for a week or so while I gathered up the energy to rip it apart and redo it. Then one evening I sat down, turned on a movie, pulled off the offending twine, and re-did my 'S'. And I'm glad I did. I can look at it without cringing now and my OCD feels so much better. I also really like how the pattern in the twine turned out.

The letter cost about $2 at JoAnn
The twine was another $2 or so at wally world, and there was enough on the roll for me to fix the mistakes from the first time around.
I already had the hot glue
So, about $4 all together
(This is one of the projects from my other blog)

Sunday, February 7, 2010

A note about the lack of projects posted so far

I'd really like to be posting a lot more projects, but with the upcoming move that's just not going to happen.

1. I'm trying really hard to spend as little money as possible. And I do mean as little as possible. It helps that I have to make arrangements with my FIL in order to run errands. I don't want to take advantage of him, so I'm only borrowing his car once a week. Limited funds also makes it easier to keep the expenditures low. So no new materials to work with.

2. I want to start getting things packed up. 96% of our stuff is in storage already, so I know I have stuff I could be using for projects, but I don't know where that stuff is. I also need to start packing the stuff that's in the house, and that includes my craft paraphenelia.

3. I'm so trunky. On my mission that term was applied to missionaries who were (hopefully, but unfortunately not always) close to the end of their time and were thinking more and more about home, school, etc. That's me. I'm thinking more and more about the house we're going to rent, the preschool I need to find, the stores I need to locate, the parks to explore, the house I get to furnish (Have I mentioned we have very little actual furniture? That'll be another post all together), the list could go on and on. It's hard to focus on the here and now when there's so many other things to think about. And there's only so much room in my brain :)

Once we move and I get everything unpacked, I'll have lots of projects and pictures to share, but in the meantime we're stuck with a couple old projects from my other blog, a couple quick projects that I have the stuff for and want to finish before the move, and me blathering on a bit. Stick with me and it'll get more exciting!

Wednesday, January 13, 2010

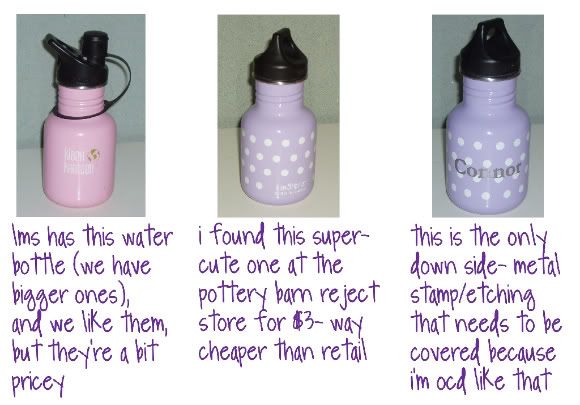
Frugal Kleen Kanteen rehab

This is a project that didn't cost me much, but saved me a lot of money.
Original cost:
New lavender dot Kleen Kanteen bottle (from Pottery Barn Kids): $19.00
New lavender dot Kleen Kanteen with monogram (from PBK): $25.50

My cost:
$3.00 for the bottle
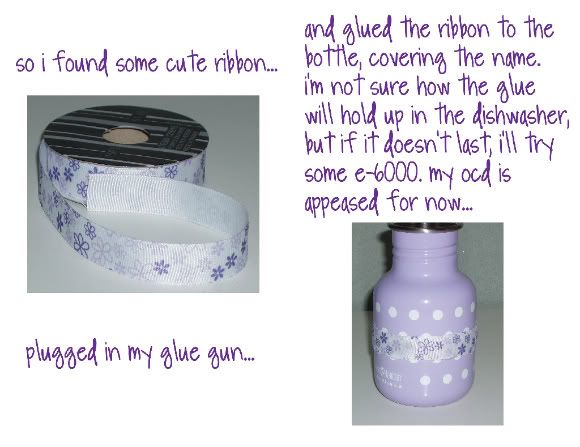
$0.50 for ribbon (guesstimate on how much the ribbon I used cost, since I didn't use the whole spool)
$0 for glue gun and hot glue that I already had
$4.15 for sports top on ebay

I will sell the loop top that came with bottle for $3.99 on ebay

Total cost for me:$7.65-$3.99=$3.66 for a bottle that goes for $19+. I think I did pretty good!
I posted this originally on my other blog back in October, and the hot glue has held up fine so far- the ribbon hasn't come off or even started pulling up.